Thursday, March 24, 2016

IP4 (IPv4) Address Classes and Subnetting

Understanding the IP4 address space is the foundation of everything else when working with networking and the Ethernet.

Internet Protocol hierarchy contains several classes of IP Addresses to be used efficiently in various situations as per the requirement of hosts per network. Broadly, the IPv4 Addressing system is divided into five classes of IP Addresses. All the five classes are identified by the first octet of IP Address.

Thanks to Tutorials Point the Original Source:
https://www.tutorialspoint.com/ipv4/ipv4_address_classes.htm

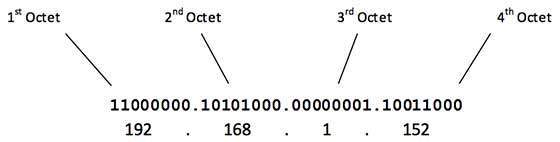
Internet Corporation for Assigned Names and Numbers is responsible for assigning IP addresses.
The first octet referred here is the left most of all. The octets numbered as follows depicting dotted decimal notation or DDN of IP Address:

IP decimal notation


The number of networks and the number of hosts per class can be derived by this formula:

Number of networks

When calculating hosts' IP addresses, 2 IP addresses are decreased because they cannot be assigned to hosts, i.e. the first IP of a network is network number and the last IP is reserved for Broadcast IP.

Class A Address

The first bit of the first octet is always set to 0 (zero). Thus the first octet ranges from 1 – 127, i.e.


Class A addresses only include IP starting from 1.0.0.0 to 127.255.255.255.

 The IP range 127.x.x.x is reserved for loopback IP addresses. IE: 127.0.0.1

The default subnet mask for Class A IP address is 255.0.0.0 which implies that Class A addressing can have 126 networks (27-2) and 16777214 hosts (224-2).
Class A IP address format is thus: 0NNNNNNN.HHHHHHHH.HHHHHHHH.HHHHHHHH

Class B Address

An IP address which belongs to class B has the first two bits in the first octet set to 10, i.e.


The class B IP addresses range from 128.0.0.0 to 191.255.255.255.
 The default subnet mask for Class B is 255.255.0.0.
Class B has 16384 (214) Network addresses and 65534 (216-2) Host addresses.
Class B IP address format is: 10NNNNNN.NNNNNNNN.HHHHHHHH.HHHHHHHH

Class C Address

The first octet of Class C IP address has its first 3 bits set to 110, that is:


Class C IP addresses range from 192.0.0.0 to 223.255.255.255.
 The default subnet mask for Class C is 255.255.255.0.

Class C gives 2097152 (221) Network addresses and 254 (28-2) Host addresses.
Class C IP address format is: 110NNNNN.NNNNNNNN.NNNNNNNN.HHHHHHHH

Class D Address

Very first four bits of the first octet in Class D IP addresses are set to 1110, giving a range of:

Class D has IP address rage from 224.0.0.0 to 239.255.255.255. Class D is reserved for Multicasting. In multicasting data is not destined for a particular host, that is why there is no need to extract host address from the IP address, and Class D does not have any subnet mask.

Class E Address

This IP Class is reserved for experimental purposes only for R&D or Study. IP addresses in this class ranges from 240.0.0.0 to 255.255.255.254. Like Class D, this class too is not equipped with any subnet mask.


Monday, March 21, 2016

DateTime Stamp in Windows cmd and dos

This will will create a datetime stamp for a log file in Windows.
 
 
1. Create a cmd or bat file and copy the below text into the file and save.


@------------------ 
 
@Echo Off

for /f "tokens=1-5 delims=:" %%d in ("%time%") do set var=%date:~10,4%%date:~4,2%%date:~7,2%-%%d%%e

set datetimestr=%var: =0%

set logfile=LogFile-%datetimestr%.txt

echo %logfile%


Thanks to this post this worked for me. 
 
Ref: http://superuser.com/questions/315984/how-to-get-the-date-in-a-batch-file-in-a-predictable-format/316153


Three steps get SNMP working on CentOS and RedHat


1. Install snmp with yum or other method

2. Configure

Backup and setup readonly user in config file
>mv /etc/snmp/snmpd.conf /etc/snmp/snmpd.conf.org
>vi /etc/snmp/snmpd.conf

    rocommunity  public
    syslocation  “My Computer Room”

 Restart Service

 >service snmpd restart

 Set Service to autostart

>chkconfig –list snmpd
snmpd           0:off   1:off   2:on    3:on    4:on    5:on    6:off

>chkconfig snmpd on

Open port in firewall if needed
>vi /etc/sysconfig/iptables

-A INPUT -p udp -m state –state NEW -m udp –dport 161:162 -j ACCEPT
-A INPUT -p tcp -m state –state NEW -m tcp –dport 161:162 -j ACCEPT

Restart Firewall
>service iptables restart

3. Test

Network Setup in Linux


In Redhat and CentOS
Network interface cards are auto-discovered, they can be seen here; /etc/udev/rules.d/ in the file 70-persistent-net.rules
View the File:
cat /etc/udev/rules.d/70-persistent-net.rules
Output:
# This file was automatically generated by the /lib/udev/write_net_rules
# program, run by the persistent-net-generator.rules rules file.
#
# You can modify it, as long as you keep each rule on a single
# line, and change only the value of the NAME= key.
# net device () (custom name provided by external tool)
SUBSYSTEM==”net”, ACTION==”add”, DRIVERS==”?*”, ATTR{address}==”00:15:5d:xx:xx:xx”, ATTR{type}==”1″, KERNEL==”eth*”, NAME=”eth1″
# net device () (custom name provided by external tool)
SUBSYSTEM==”net”, ACTION==”add”, DRIVERS==”?*”, ATTR{address}==”00:15:5d:xx:xx:xx”, ATTR{type}==”1″, KERNEL==”eth*”, NAME=”eth0″

Note: In Linux 2.6 and above UDEV is the auto-discovery device manager and replaces the functionality of both hotplug and hwdetect. See: udev-ArchWiki and udev-Wikipedia
The network configuration files may also be auto created here: /etc/sysconfig/network-scripts/ in the file ifcfg-ethXX